vue开发问题总结

vue开发问题总结

vue 开发中遇到的一些问题及解决方法

# 一、前后端跨域接口实现

# 1、安装 axios 插件并设置全局

1
npm install axios --save-dev

安装完成后对 axios 进行全局调用,在 main.js 中设置

1
2
import axios from 'axios'
Vue.prototype.$axios = axios

# 2、设置跨域代理

在 config 文件夹的 index.js 文件中 (或者是在 vue.config.js 中),设置 proxy 模块代理,之后重启项目

1
2
3
4
5
6
7
8
9
10
11
12
13
14
15
16
17
18
19
devServer: {
port: port,
open: true,
overlay: {
warnings: false,
errors: true
},
// before: require('./mock/mock-server.js')
proxy: {
[process.env.VUE_APP_BASE_API]: {
target: 'http://0.0.0.0:8000/', // 用于本地调试
// target: '', // 用于生产环境
changeOrigin: true,
pathRewrite: {
['^' + process.env.VUE_APP_BASE_API]: ''
}
}
}
},

# 3、 发送请求

在 src 的 views 文件夹中创建 test.vue 文件,在文件中进行编写,这里只介绍 js 部分,在 method 方法中设置接口,如下:

1
2
3
4
5
6
7
8
9
10
11
12
13
14
15
16
17
18
19
20
21
22
23
loopResult (data) {
const self = this;
let e;
self.axios.get(
'/index/start/'
).then(res => {
// 根据状态码判断是否跨域成功
if (res.data.recode === 2000) {
var jsonObj = JSON.parse(JSON.stringify(res.data));
// 解析json数据
jsonObj = jsonObj.data;

console.log(self.tableData[i].text_id);
}
}
else {
alert('获取数据失败');
}
}
).catch(err => {
console.log(err);
});
},

这样便可以调用 data 中声明的变量对应数据,从而在页面显示出来。

1
2
3
4
5
6
7
8
9
10
11
12
export default {
data() {
return {
page: 1,
offset: 10,
totalNum: 1000,
tableData: []
}
},
}


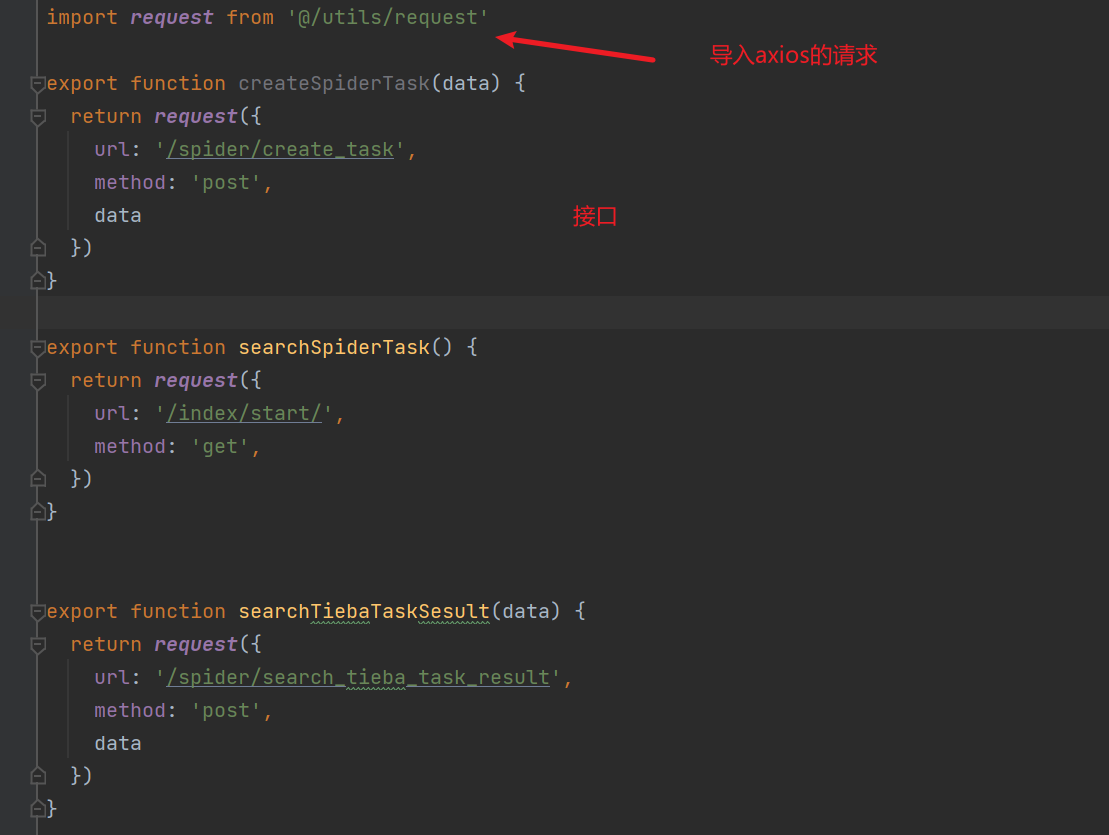
也可以将异步方法封装成 spider.js, 如

image-20220306231244869

在 request.js 中,可以改 VUE_APP_BASE_API 为想要的值
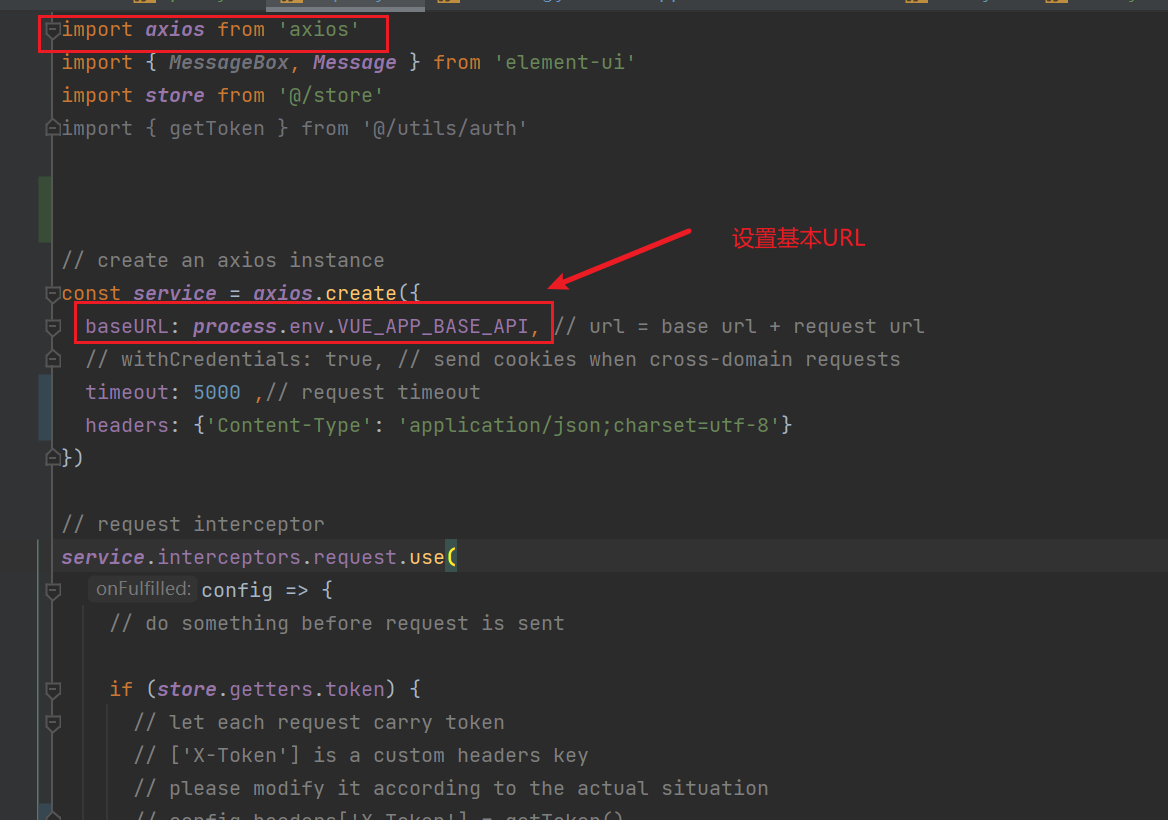
image-20220306231453092

# 二、 动态表格实现

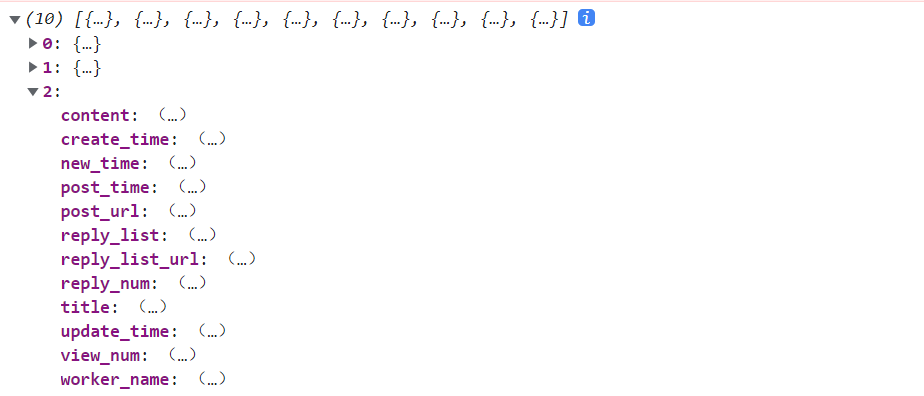
在 vue 的 template 中引入 el-table,props 对应后端传来的 json 数组中元素的名称
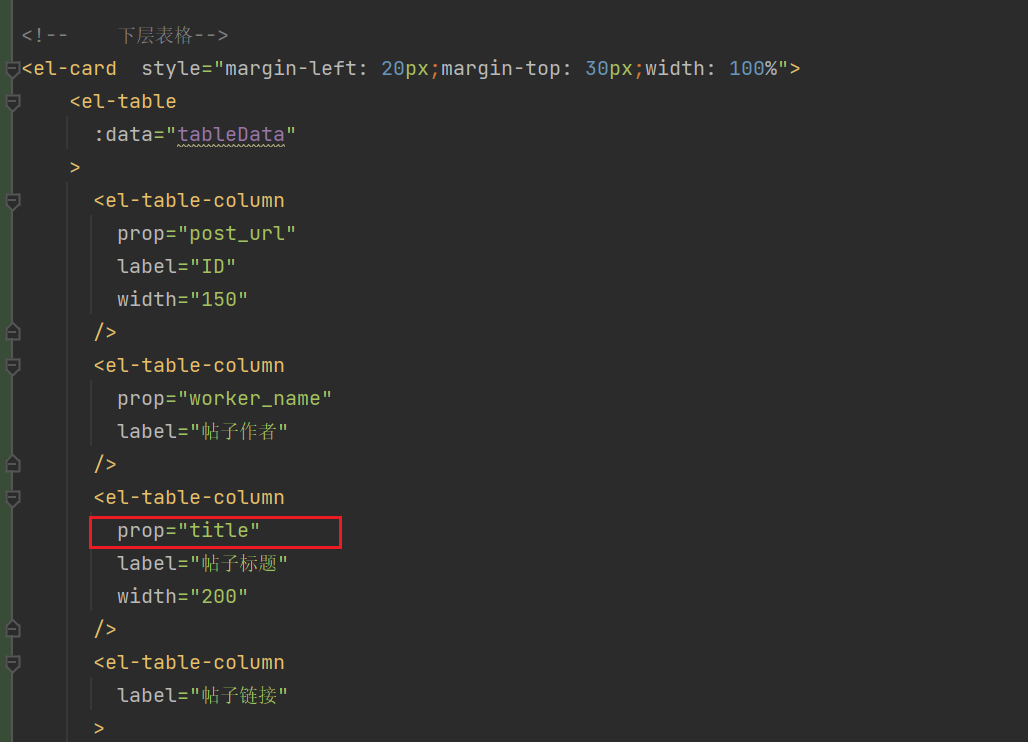
image-20220306231741321

image-20220306231828087

# 三、vue - 将数据存入 vuex 中以及从 vuex 中取出数据

转载自:https://juejin.cn/post/7025522047988006925#heading-8

Vuex 是一个专为 Vue.js 应用程序开发的状态管理模式。它采用集中式存储管理应用的所有组件的状态,并以相应的规则保证状态以一种可预测的方式发生变化。简单来说就是:应用遇到多个组件共享状态时,使用 vuex。

# vuex 的五个核心概念:

  • State:共享状态,vuex 的基本数据,用来存储变量,相当于组件 data 里的数据,只不过此时变成了全局变量。
  • Getter:基于 state 的派生状态,相当于组件中的 computed 中的属性。
  • Mutation:更改 vuex 中 store 共享状态的方法,通过提交 mutation 来去修改状态,进行同步操作数据,通常用于 action 获取异步数据,获取通过 commit 提交数据给 mutation,在 mutation 同步操作 state 中的数据。
  • action:支持异步操作,可用于异步获取请求中的数据,并将获取的数据同步 commit 提交给 mutation,实现 ajax 异步请求数据,mutation 将其数据同步到 state 中。
  • modules:模块化 vuex,为了方便后期对于项目的管理,可以让每一个模块拥有自己的 state、mutation、action、getters, 使得结构非常清晰,方便管理。

优势和劣势有哪些?
优势主要就是可以全局共享数据,方法。方便统一管理
劣势的话,页面刷新后 state 的变量都会还原清空,不会像 cookies 一样持久性存储

页面刷新后 vuex 的 state 数据丢失怎么解决?
先说一下为什么会丢失呢?
因为 store 里的数据是保存在运行内存中的,当页面刷新时页面会重新加载 vue 实例,store 里面的数据就会被重新赋值

如何避免?
其实主要还是看使用的场景是怎样的,如果想某些数据持久性保留也可以搭配使用 cookies 或者 localStorage。比如一些登录的信息等。
比如请求拿到了登录信息后可以先存在 localStorage,将 state 里的变量值和 sessionStorage 里面的绑定,mutations 中修改的时候同时修改 state 和 localStorage。最后页面直接使用 vuex 中的变量。

# 正式进入使用

vuex 的安装
打开终端,输入命令行 npm install vuex --save 进行下载 vuex

# vuex 应用核心管理仓库 构建 store

这里新建 store 文件夹,创建一个 js 取名为 index.js,
在 index 里 ,通过将 state,mutations,actions,getters 引入到 store 中,并暴露出 store 对象。

下面为 index.js 的代码

1
2
3
4
5
6
7
8
9
10
11
12
13
14
15
16
17
18
19
20
21
22
/*
vuex最核心的管理对象 store
*/
import Vue from 'vue';
import Vuex from 'vuex';

// 分别引入这四个文件 这四个文件的内容和用法在下面分别讲到
import state from './state';
import mutations from './mutations';
import actions from './actions';
import getters from './getters';

//声明使用插件
Vue.use(Vuex)
//new 一个Vuex的对象,将state,mutation,action,getters配置到vuex的store中,方便管理数据

export default new Vuex.Store({
state,
mutations,
actions,
getters,
})

挂载 store 到 vue 实例上
main.js 中

1
2
3
4
5
6
7
8
import store from './store'
// ..........
new Vue({
el: '#app',
router,
store, // ***
render: h => h(App)
})

# state 状态管理数据

我们通常将需要进行管理的共享数据,放入 state 中,使其形似为全局变量,对于需要的组件进行引入该 state 状态数据。

1
2
3
4
5
6
7
8
9
10
const state = {
userId: '',
token: '',
name: '',
avatar: '',
introduction: '',
roles: [],
tenantId: 1,
userInfo: null
};

# mutations 同步提交数据

mutations 用于更改 state 中的状态逻辑的,且为同步更改 state 中的状态数据。
需要知道的是在 vuex 中只能通过 mutation 来去修改 state 对象,
可以通过获取 actions 获取到的数据去修改 state, 也可以在 mutations 模块中直接定义方法来去更改状态数据。

1
2
3
4
5
6
7
8
9
10
11
12
13
14
15
16
17
18
19
20
const mutations = {
SET_TOKEN: (state, token) => {
state.token = token;
},
SET_USERID: (state, userId) => {
state.userId = userId;
},
SET_NAME: (state, name) => {
state.name = name;
},
SET_ROLES: (state, roles) => {
state.roles = roles;
},
SET_TENANTID: (state, roles) => {
state.tenantId = roles;
},
SET_USER_INFO: (state, userInfo) => {
state.userInfo = userInfo;
}
};

通过 mutations 和下面的 actions 模块,大家也可以看出 commit 是用于调用 mutation 模块中的。
在组件中调用其 mutation 模块的代码为:

1
this.$store.commit('SET_TOKEN', token_data) 

# actions 的异步操作

actions 与其 mutations 类似,但其可以进行异步操作,
且将异步操作获取的数据提交给 mutations,使得 mutations 更改 state 中的状态数据,这里常常用于获取 ajax 请求中的数据 (因为是异步),并将其获取的数据 commit 提交给 mutations 使得 state 数据状态的更新。

和 mutations 的不同之处在于:

  1. Action 提交的是 mutation,而不是直接变更状态。
  2. Action 可以包含任意异步操作。

举例

1
2
3
4
5
6
7
8
9
10
11
12
13
14
15
16
17
18
19
20
21
22
23
24
25
26
27
28
29
30
31
32
33
34
35
36
37
38
/* 下面就是通过actions执行异步Ajax请求,
得到数据后,
通过commit的方法调用mutations 从而更新数据
例如: commit('SET_TOKEN', data.uuid);
*/

const actions = {
login({ commit }, userInfo) { // 用户登录
const params = userInfo;
params.userName = userInfo.userName.trim()
return new Promise((resolve, reject) => {
getLogin(params)
.then((response) => {
const { status, message, data } = response || {};
if (status === 200) {
// 存入 参数: 1.调用的值 2.所要存入的数据
commit('SET_USER_INFO', data);
commit('SET_TOKEN', data.uuid);
commit('SET_USERID', data.id);
commit('SET_ROLES', data.roles);
commit('SET_NAME', data.realName);
commit('SET_TENANTID', data.tenantId || 1);
setToken(data.uuid);
db.save('userInfo', data);
db.save('tenantId', data.tenantId || 1);
localStorage.setItem('loginToken', data.uuid);
resolve(data);
} else {
// ElementUI.Message.error(message); // axios拦截统一提示了
}
})
.catch((error) => {
// ElementUI.Message.error(error.message); // axios拦截统一提示了
reject(error);
});
});
},
}

这个 actions 在组件中的调用方法就是:

1
2
3
4
5
6
 this.$store.dispatch('user/login', postUser)
.then(res => {
// .............
})
// 我这里的login方法写在了user.js这个module里 所以这里调用是 user/login
// 下面会讲到module

# Getters 对 state 进行加工

Getters 相当于 computed 计算属性,用于加工处理 state 状态数据,有其两个默认参数,第一个默认参数为 state,第二个默认参数为 getters。

1
2
3
4
5
6
7
8
9
const getters={
plusCount(state){
return state.count + 1
},
//获取state中状态数据对象,和获取getters模块中plusCount数据
totalCount(state,getters){
return getters.plusCount + state.count
}
}

在组件中调用该方法的代码片段为:

1
this.$store.getters.totalCount()

# 在 Vue 组件中获得 Vuex 状态

store 实例中读取状态最简单的方法就是在计算属性中返回某个状态,由于 Vuex 的状态存储是响应式的,所以在这里每当 store.state.count 变化的时候,都会重新求取计算属性,进行响应式更新。

1
2
3
4
5
computed: {
count: function(){
return this.$store.state.count
}
},

那么对于以上的 store 我们就简单介绍完了,相信大家看完后对于 vuex 会有一定的理解。那么这个时候我们要想,是不是使用 this.$store.statethis.$store.getters.xxx 感到麻烦呢?下面我们介绍另一种引入 state 和 getters 的方式

# 辅助函数 mapState 和 mapGetters

对于上述的在组件中引用 state 和 getters 的方法是不是感到麻烦呢?使用 mapState 你将会感受到便利。
组件中这样使用

1
2
3
4
5
6
7
8
9
10
11
12
13
14
15
16
17
18
19
20
21
22
//首先我们需要先将辅助函数引入
import { mapGetters,mapState } from 'vuex'

export default {
computed: {

// 使用对象展开运算符将 getter 混入 computed 对象中
...mapGetters( ['plusCount','totalCount'] )

// 使用对象展开运算符将 state 混入 computed 对象中
...mapState( ['userInfo','count'] )

},
methods:{
getData(){
// 这里就能直接使用了 直接使用state 和getters里的数据
// this.userInfo
// this.plusCount

}
}
}

# Module 子模块化管理

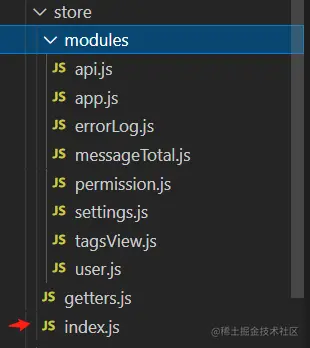
store 文件夹下的 index.js 代码如下

1
2
3
4
5
6
7
8
9
10
11
12
13
14
15
16
17
18
19
20
21
22
23
import Vue from 'vue'
import Vuex from 'vuex'
import getters from './getters'

Vue.use(Vuex)


const modulesFiles = require.context('./modules', true, /\.js$/)


const modules = modulesFiles.keys().reduce((modules, modulePath) => {
const moduleName = modulePath.replace(/^\.\/(.*)\.\w+$/, '$1')
const value = modulesFiles(modulePath)
modules[moduleName] = value.default
return modules
}, {})

const store = new Vuex.Store({
modules,
getters
})

export default store

文件目录如图

img

举例 api.js

1
2
3
4
5
6
7
8
9
10
11
12
13
14
15
16
17
18
19
20
21
22
23
24
25
26
27
28
29
30
31
32
33
34
35
36
37
38
39
40
41
42
43
44
45
46
47
48
49
50
51
52
53
54
55
56
57
58
59
60
61
62
63
64
65
66
67
68
69
70
71
72
73
74
75
76
77
78
79
80
81
82
83
84
85
86
87
88
89
90
91
92
93
94
95
96
97
98
99
100
101
102
103
104
105
106
107
108
109
110
111
112
113
114
115
116
117
118
119
120
121
122
123
124
125
126
127
128
129
130
131
132
133
134
135
136
137
138
139
140
141
142
143
144
145
146
147
148
149
150
151
152
153
154
155
156
157
158
159
160
161
162
163
164
165
166
167
168
169
170
171
172
173
174
175
176
177
178
179
180
181
182
183
184
185
186
187
188
189
190
191
192
import { getKey, getLogin, logout, getInfo } from '@/api/user';
import { setToken, removeToken } from '@/utils/auth';
import db from '@/utils/localstorage';
import router, { resetRouter } from '@/router';
import ElementUI from 'element-ui';
const state = {
userId: '',
token: '',
name: '',
avatar: '',
introduction: '',
roles: [],
tenantId: 1,
userInfo: null
// roles: ['9999']
};

const mutations = {
SET_TOKEN: (state, token) => {
state.token = token;
},
SET_USERID: (state, userId) => {
state.userId = userId;
},
SET_NAME: (state, name) => {
state.name = name;
},
SET_ROLES: (state, roles) => {
state.roles = roles;
},
SET_TENANTID: (state, roles) => {
state.tenantId = roles;
},
SET_USER_INFO: (state, userInfo) => {
state.userInfo = userInfo;
}
};

const actions = {
// 获取密钥
getKey({ commit }) {
return new Promise((resolve, reject) => {
getKey()
.then((response) => {
resolve(response);
})
.catch((error) => {
reject(error);
});
});
},

// 用户登录
login({ commit }, userInfo) {
// const { username, password } = userInfo;
const params = userInfo;
params.userName = userInfo.userName.trim()
return new Promise((resolve, reject) => {
// console.log(username, password);
// setToken(state.token)
// localStorage.setItem('loginToken', state.token)
getLogin(params)
// getLogin({ userName: username.trim(), password: password })
.then((response) => {
const { status, message, data } = response || {};
if (status === 200) {
// 存入 参数: 1.调用的值 2.所要存入的数据
commit('SET_USER_INFO', data);
commit('SET_TOKEN', data.uuid);
commit('SET_USERID', data.id);
commit('SET_ROLES', data.roles);
commit('SET_NAME', data.realName);
commit('SET_TENANTID', data.tenantId || 1);
setToken(data.uuid);
db.save('userInfo', data);
db.save('tenantId', data.tenantId || 1);
localStorage.setItem('loginToken', data.uuid);
resolve(data);
} else {
// ElementUI.Message.error(message); // axios拦截统一提示了
}
})
.catch((error) => {
// ElementUI.Message.error(error.message); // axios拦截统一提示了
reject(error);
});
});
},

// 获取用户信息
getInfo({ commit, state }) {
return new Promise((resolve, reject) => {
getInfo(state.token)
.then((response) => {
const { data } = response;
data.roles = response.data.rights.map(String);
if (!data) {
reject('验证失败,请重新登录。');
}
const loginMessage = {
memberId: data.id,
userName: data.name,
userTel: data.mobile,
realName: data.realName,
incorCom: data.incorCom,
virtualCor: data.virtualCor,
deptId: data.deptId,
deptpath: data.deptpath,
deptName: data.deptName
};
localStorage.setItem('loginMessage', JSON.stringify(loginMessage));
const { id, roles, realName } = data;
// 角色必须是非空数组!
if (!roles || roles.length <= 0) {
reject('getInfo: 角色必须是非空数组!');
}
commit('SET_USERID', id);
commit('SET_ROLES', roles);
commit('SET_NAME', realName);
localStorage.setItem('userRights', roles);
// commit('SET_AVATAR', avatar)
// commit('SET_INTRODUCTION', introduction)
resolve(data);
})
.catch((error) => {
reject(error);
});
});
},

// 用户登出
logout({ commit, state }) {
return new Promise((resolve, reject) => {
logout(state.token)
.then(() => {
commit('SET_TOKEN', '');
commit('SET_ROLES', []);
db.remove('router');
removeToken();
resetRouter();
resolve();
})
.catch((error) => {
reject(error);
});
});
},

// 删除token
resetToken({ commit }) {
return new Promise((resolve) => {
commit('SET_TOKEN', '');
commit('SET_ROLES', []);
removeToken();
resolve();
});
},

// 动态修改权限
changeRoles({ commit, dispatch }, role) {
return new Promise(async(resolve) => {
const token = role + '-token';

commit('SET_TOKEN', token);
setToken(token);

const { roles } = await dispatch('getInfo');
console.log(roles, 'rolesrolesroles');
resetRouter();

// 根据角色生成可访问路由映射
const accessRoutes = await dispatch('permission/generateRoutes', roles, {
root: true
});

// 动态添加可访问路由
router.addRoutes(accessRoutes);

// 重置已访问视图和缓存视图
dispatch('tagsView/delAllViews', null, { root: true });

resolve();
});
}
};

export default {
namespaced: true,
state,
mutations,
actions
};

这样后可以按功能分 module 使用

页面中调用就是

1
2
3
4
5
6
7
8
9
10
11
// 使用mutations
this.$store.commit('api/SET_T', keys);

// 使用actions
this.$store.dispatch('user/login', postUser).then(res => {

})

// 如果没有分module
// 那就是 this.$store.commit('SET_T', keys);
// 直接调用方法

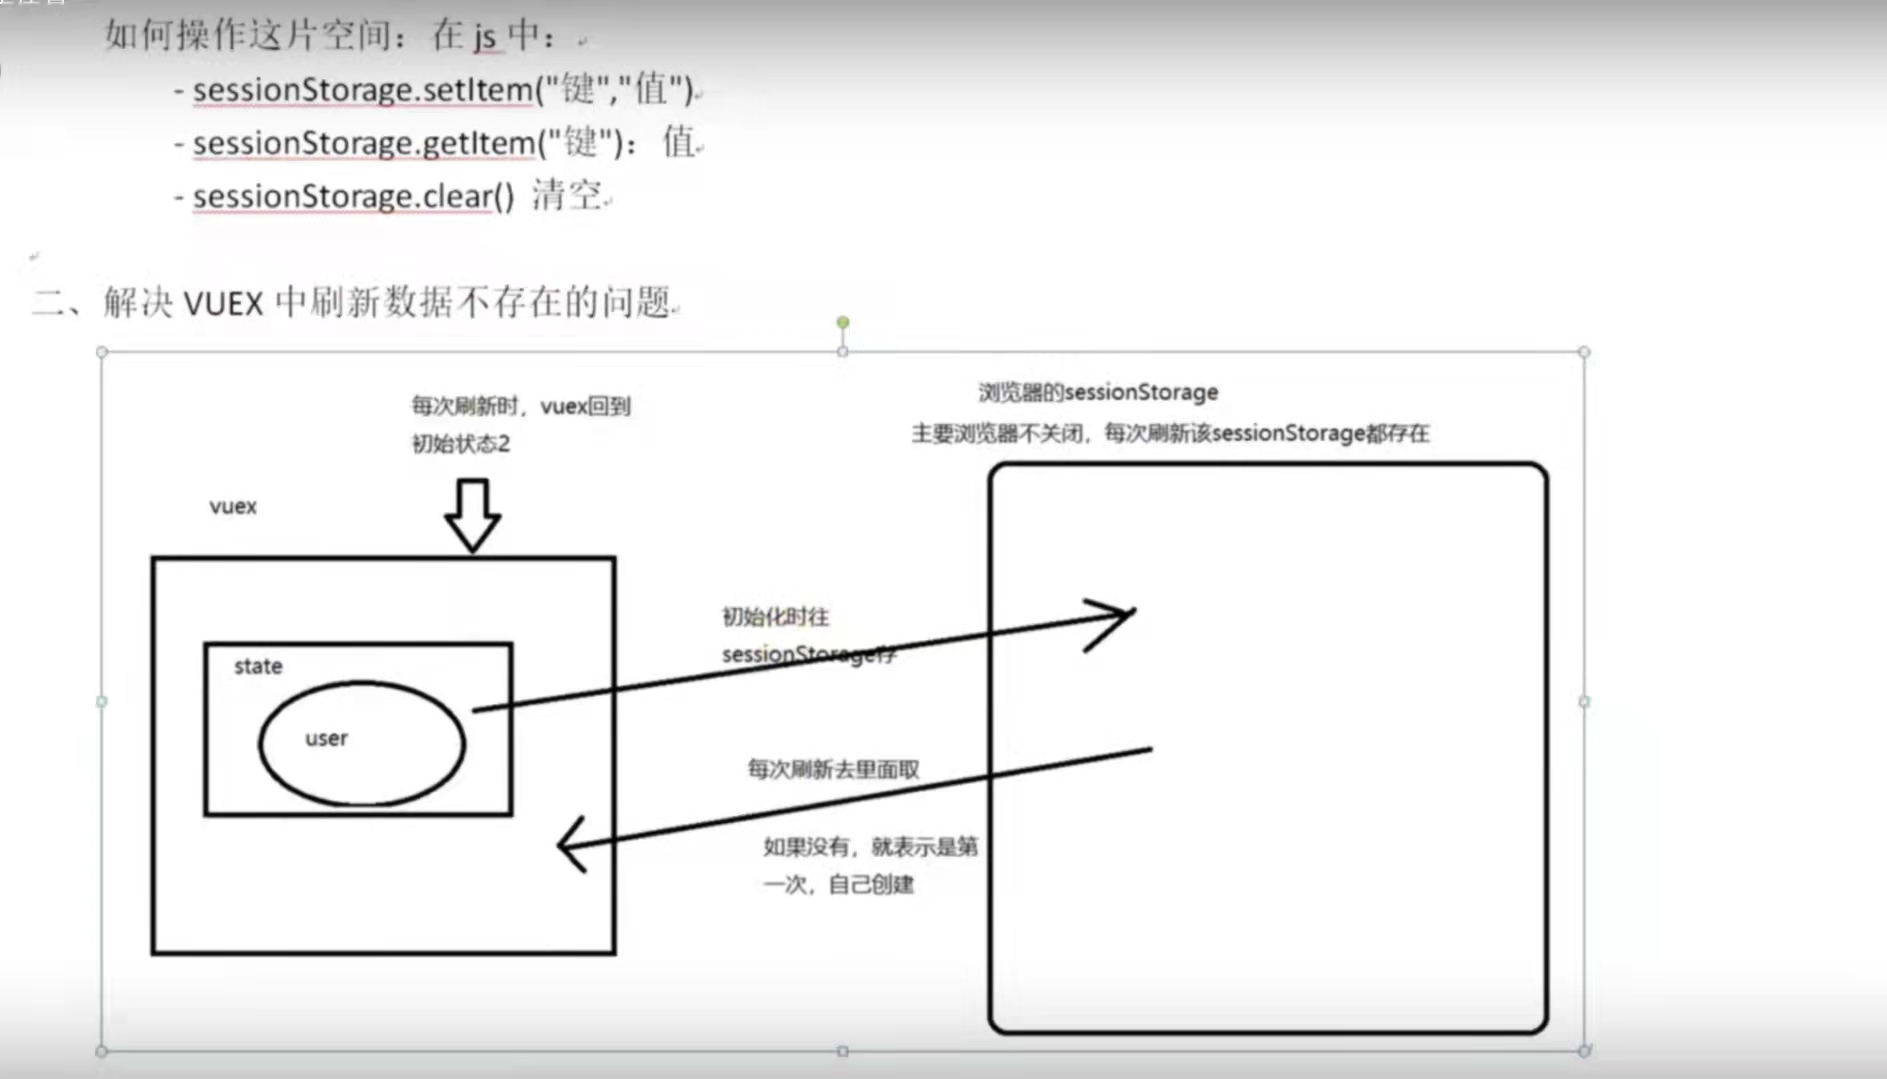
# 四、解决 vuex 中刷新数据,数据消失问题

# 解决方法

image-20220305212724638

# 操作

在自定义的 waiter.js 中加入 sessionStorage

1
2
3
4
5
6
7
8
9
10
11
12
13
14
15
16
17
18
19
20
21
22
23
24
25
26
27
28
29
30
31
32
33
34
35
36
37
38
39
40
41
42
43
44
45
46
47
48
49
50
51
52
53
import {searchSpiderTask} from "@/api/spider";

const state = {
// authInfo: JSON.parse(sessionStorage.getItem("COMPANY_AUTH_INFO")) || {}
tableData: JSON.parse(sessionStorage.getItem("tableData")) || [],
count: 0,
title:'首页',
// tableData:[],

}

const getters = {
// tableData: state => state.tableData,
}

const mutations = {

// change:(state,text)=>{
// state.title=text;
// },
// add:(state)=>{
// state.count++
// },

GET__tableData(state,data){
state.tableData=data //数据更改
sessionStorage.setItem("tableData", JSON.stringify(state.tableData)) //存sessionStorage
},


}

const actions={

getList(context){
searchSpiderTask().then(
res=>{
console.log(res.data);
context.commit('GET__tableData',res.data); //传后端数据
}
)

}
}

export default {
namespaced: true,
state,
getters,
mutations,
actions,
}

在对应的 vue 中

1
2
3
4
5
6
7
8
9
10
11
12
13
14
15
16
17
18
19
20
21
//触发方法
<el-button type="primary" plain @click="loopResult" style="margin-left: 10px">检查</el-button>

//method部分
loopResult(data){
this.$store.dispatch('waiter/getList') //传actions

searchSpiderTask().then(response => {
console.log(response.code)
if(response.code===20000) {
const h = this.$createElement
this.$notify({
title: '搜索成功',
message: h('i', {style: 'color: teal'}, '搜索成功'),
duration: 1000
})
}
}).catch(err => {
console.log(err)
})
},

# 五、一些其他问题的解决方法

Author

y1seco

Posted on

2022-03-07

Updated on

2022-03-07

Licensed under

Comments

:D 一言句子获取中...